Simplify Your LoggerNet Network Setup Using LoggerNet Defaults
de Dana Worley | Atualizada: 08/19/2015 | Comentários: 0
Tópicos de blog
Area / Application


Product Category


Corporate / News
Pesquisar o Blog
Inscrever-se para o Blog
Receber e-mail quando um novo artigo é publicado. Escolha os temas de seu interesse.
Sugerir um artigo
Existe um tópico que você gostaria de saber mais à respeito? Nos informe.
Configuring a network of data loggers for communication and data collection in LoggerNet's Setup window can seem like an arduous and tedious task, but it doesn’t have to be. It’s true that you need to complete this task before you can use LoggerNet to connect to a data logger, send a program, set the clock, or collect data. However, there is a way to save yourself a lot of time, especially if the settings required for your system (such as data file location or scheduled data collection interval) are not the same as LoggerNet's default values.
We've tried to make this task a little easier In LoggerNet (version 4.2 and newer) by providing a way to change LoggerNet's default values:
- In the Setup window's Tools menu, select LoggerNet Server Settings.
- On the left side of that window, click the item named LoggerNet Defaults.
- The window shown below is displayed. You'll notice that this set of tabbed windows—Schedule, Data Files, Clock, and File Retrieval—looks like the Setup window's options.
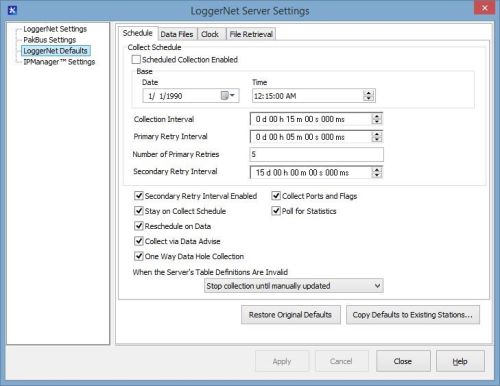
Note: After you've made and applied changes, each new data logger added to the Setup window will use the new default values.
In the LoggerNet Server Settings dialog box, you can also copy one or more of these defaults to an existing station:
- Click the Copy Defaults to Existing Stations button.
- In the left column, select those settings you wish to copy.
- In the right column, select the stations you wish to copy the default settings to.
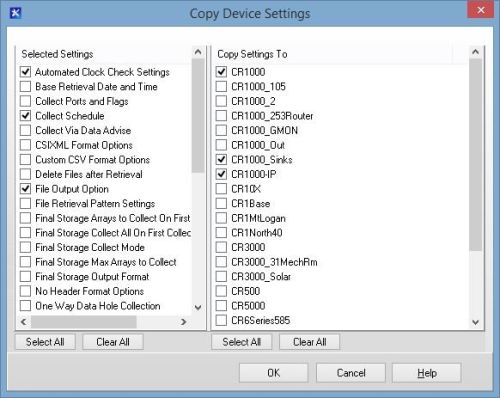
Tip: Keep in mind that not all settings apply to all data loggers. For instance, Final Storage settings are relevant to mixed-array data loggers (for example, the CR10X, CR23X), but not to table-based data loggers (such as the CR1000, CR3000).
After you click the OK button in the Copy Device Settings dialog box, take note of the message box that is displayed:
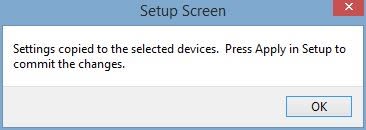
As the message indicates, the settings are copied to the selected devices. However, to apply those changes you need to return to the Setup screen and click the Apply button:

If you have questions about any setting, position your cursor within the field for the setting and press the F1 button on your keyboard. This will open the help information for the selected setting.
I hope you have found this tip on changing LoggerNet's default settings useful. Do you have another time-consuming task that we might be able to help with? Leave a comment below and tell us about it!


Sobre o autor
 Dana Worley, now retired, joined Campbell Scientific, Inc., in 1997. As an Application Specialist, Dana provided technical support and training to customers, and she developed online and written documentation. Other roles included management of R&D projects, software products, and a Software Test and Support group. Dana most recently managed our Technical Support Team in the Client Services department. She enjoys hiking, biking, traveling, and photography, and she is an accomplished artist, specializing in kiln-formed glass.
Comentários
Please log in or register to comment.